

Creating and planning tasks in Beebole
How tasks relate to projects
Projects describe what hours are logged into; tasks describe the work to be done. The two are connected but independent:- A task can exist without any project. You can plan, assign, and complete it entirely on the Planning page.
- A task can be linked to projects through its Projects attribute in the task detail panel.
- Time can be tracked on tasks directly, in the Tasks section of the timesheet.
Plannings
Every task belongs to a planning — a separate board with its own statuses, its own level names for the hierarchy, and its own mode: tasks or bookings. New Beebole accounts start with one planning named Main plan, with the statuses Backlog, Queue, In progress, and Done.- Switch plannings — Click the planning name at the top of the Planning page and pick another one from the menu.
- Create a planning — In the same menu, type a name in the Name of a new planning field and click Add. The new planning opens in the mode you last picked, Bookings by default — see Tasks or bookings.
- Open a planning’s settings — Click the settings button next to the planning name (its tooltip reads Main plan settings for the Main plan planning). The dialog holds the planning’s mode and its statuses. The button only appears if you are allowed to manage tasks.
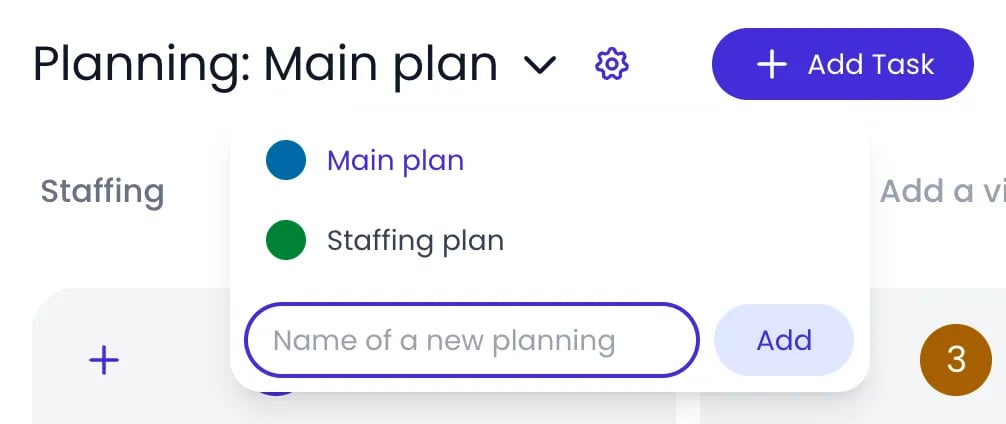
The plannings menu, opened from the planning name
Tasks or bookings
Each planning in Beebole holds one kind of item. A Tasks planning is a list of things to do — a to-do list, issues, tickets — where every item has a name of its own and a status. A Bookings planning puts people on projects: each item is a person booked on a project over a date range, at an allocation. The choice belongs to the planning, not to the view: Gantt, Kanban, List, and Staffing stay available on every planning, so you can look at the same data either way. To choose, open the planning’s settings and pick a mode under What this planning holds: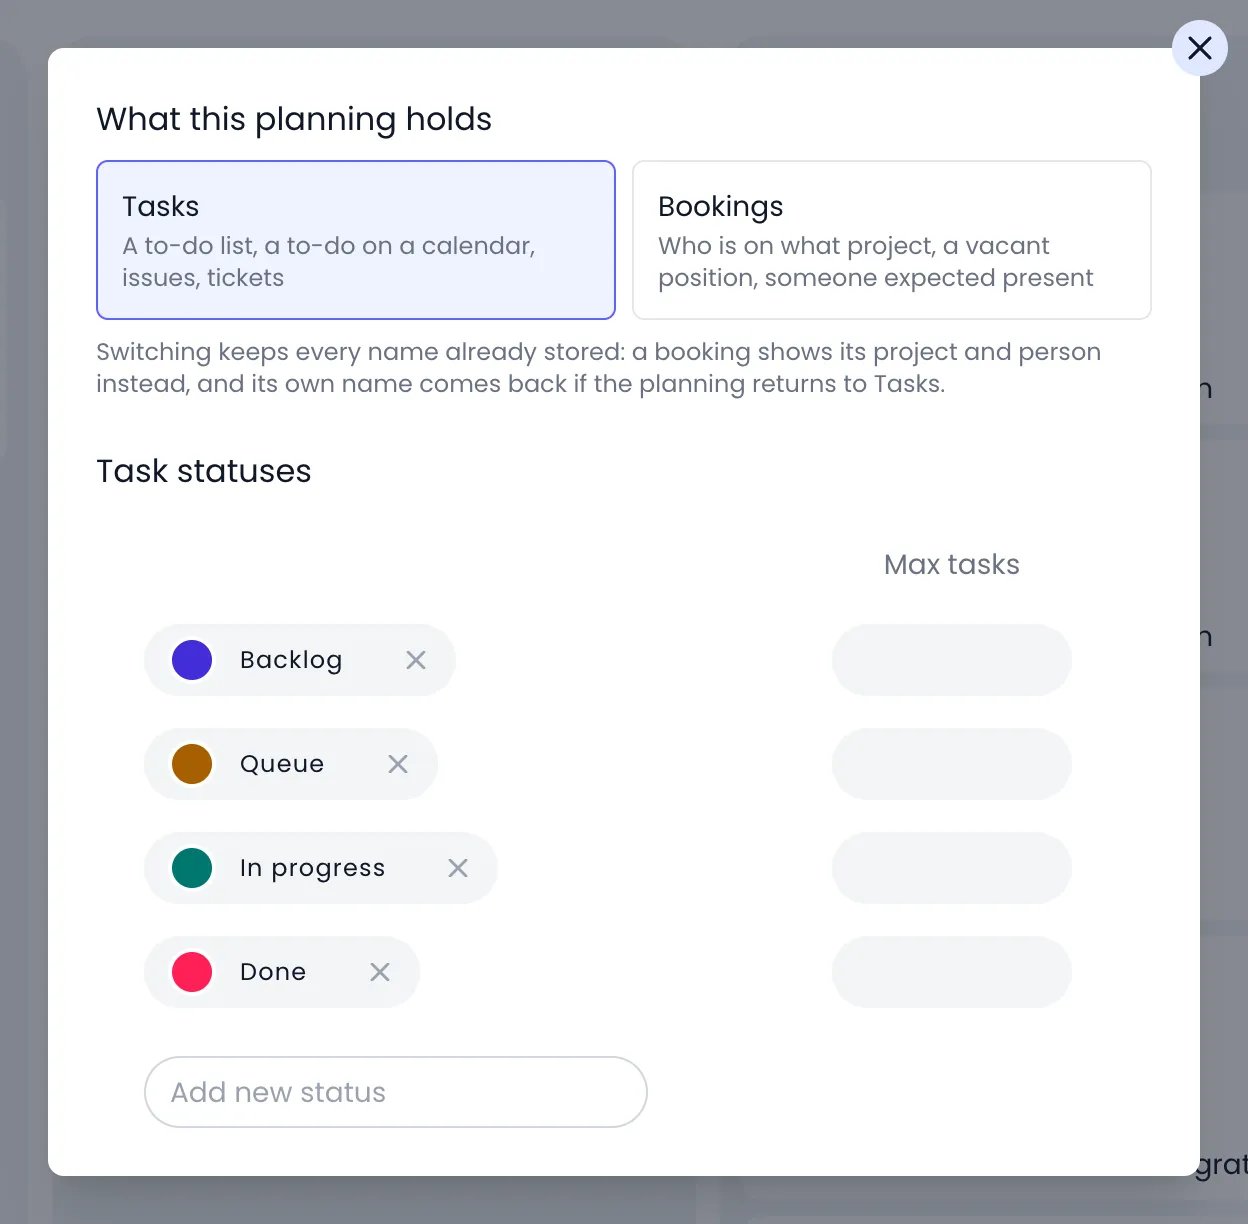
The Main plan settings: the planning's mode, then its task statuses
- In a Tasks planning, the add button reads Add Task and opens the name-and-status form described in Creating a task. In a Bookings planning, it reads Add Booking and asks for the person (Select the owner) and the project (one of the two is enough), a date range, the planned time, and the allocation (%, h/day, or Total). The planned time is filled in from the person’s work schedule, and you can change it. See Adding a booking without dragging for the details of this form.
- A booking is named after its project and person, everywhere it appears, and cannot be renamed: clicking its name shows A booking is named after its project and person. Time is not recorded on a booking either: it goes on the project instead. In a Tasks planning, you name each task yourself.
- In the Gantt and List views, each + button on a row or a group header follows the mode. In a Tasks planning, a plain click opens a name field in place, and the new task gets the row as its parent or the group’s owner, status, or project (see Adding tasks in place). In a Bookings planning, every + opens the Add Booking form with the row’s task as parent, or with the group’s person, project, or status, already filled in.
- On the Kanban board, the + in a column header opens an add card at the foot of that column in both modes. In a Tasks planning, the card asks for a name. In a Bookings planning, it asks for the person or the project, the period, and the allocation. See Adding cards to a column.
- On the Staffing timeline, a drag opens an editor right on the timeline, over the dates you drew. In a Bookings planning, the booking is saved as soon as you pick a person or a project for it. In a Tasks planning, the editor asks for the task’s name, then for the owner, projects, tags, and Planned time the planning uses, starting from the row’s person or project, and nothing is saved until you name the task and press Enter or pick a value. See Creating a booking and Creating a task on the timeline.
Creating a task
Open the Planning page
Click Add Task
Name the task and pick a status
Submit
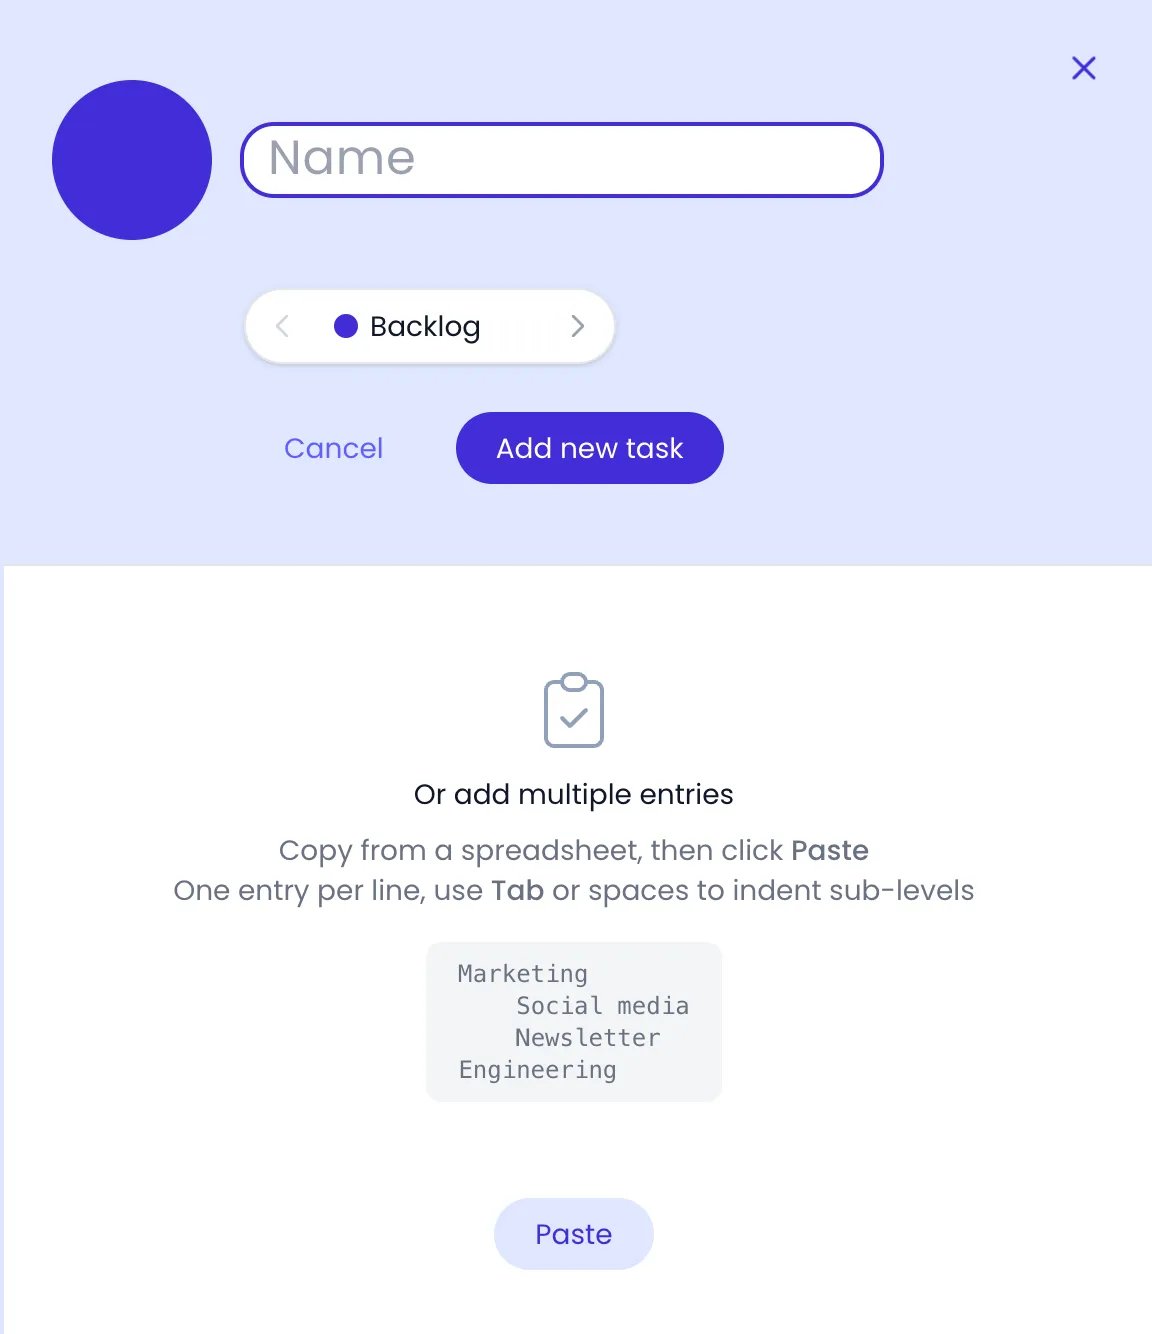
The add form: a name, the status selector, and the Or add multiple entries section below
Adding tasks in place
In the Gantt and List views, you can name new tasks right in the task list, without opening the add form:- To add a subtask, hover over a task’s row and click the + button next to its name. A name field opens under that row.
- To add a task to a group, hover over the group header of a grouped view and click its + button (Add Task). The name field opens at the top of the group, and the new task gets the group’s owner, status, or project.
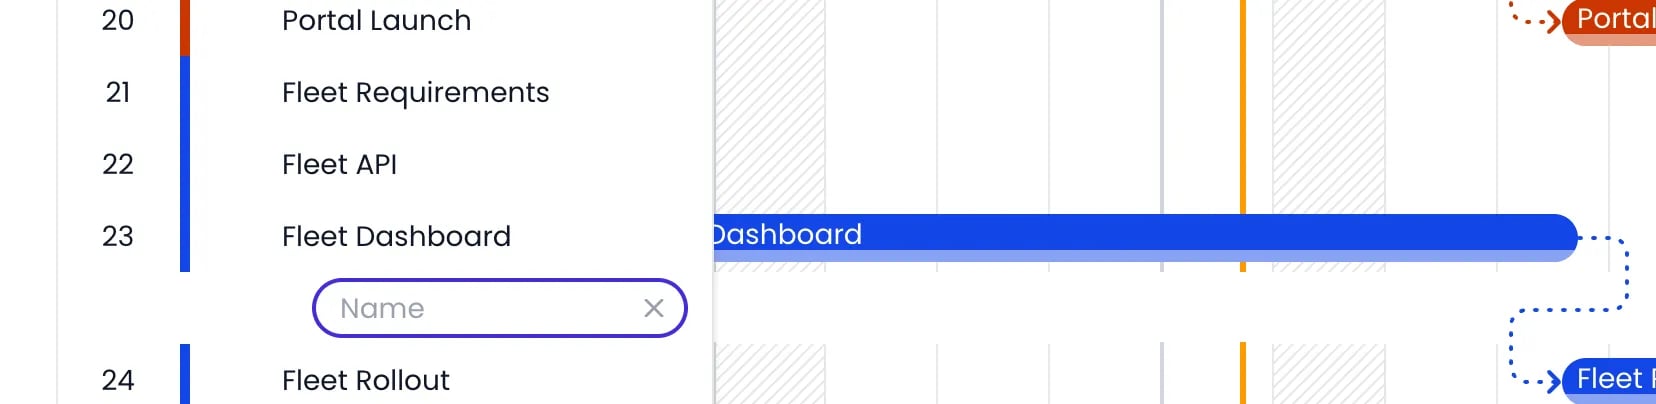
The name field opened under a task's row in the Gantt, ready for a subtask's name
Adding many tasks at once
You can import a whole task list by pasting it from a spreadsheet — there is no file upload involved.Open the add panel
Copy and paste your list
Review and confirm
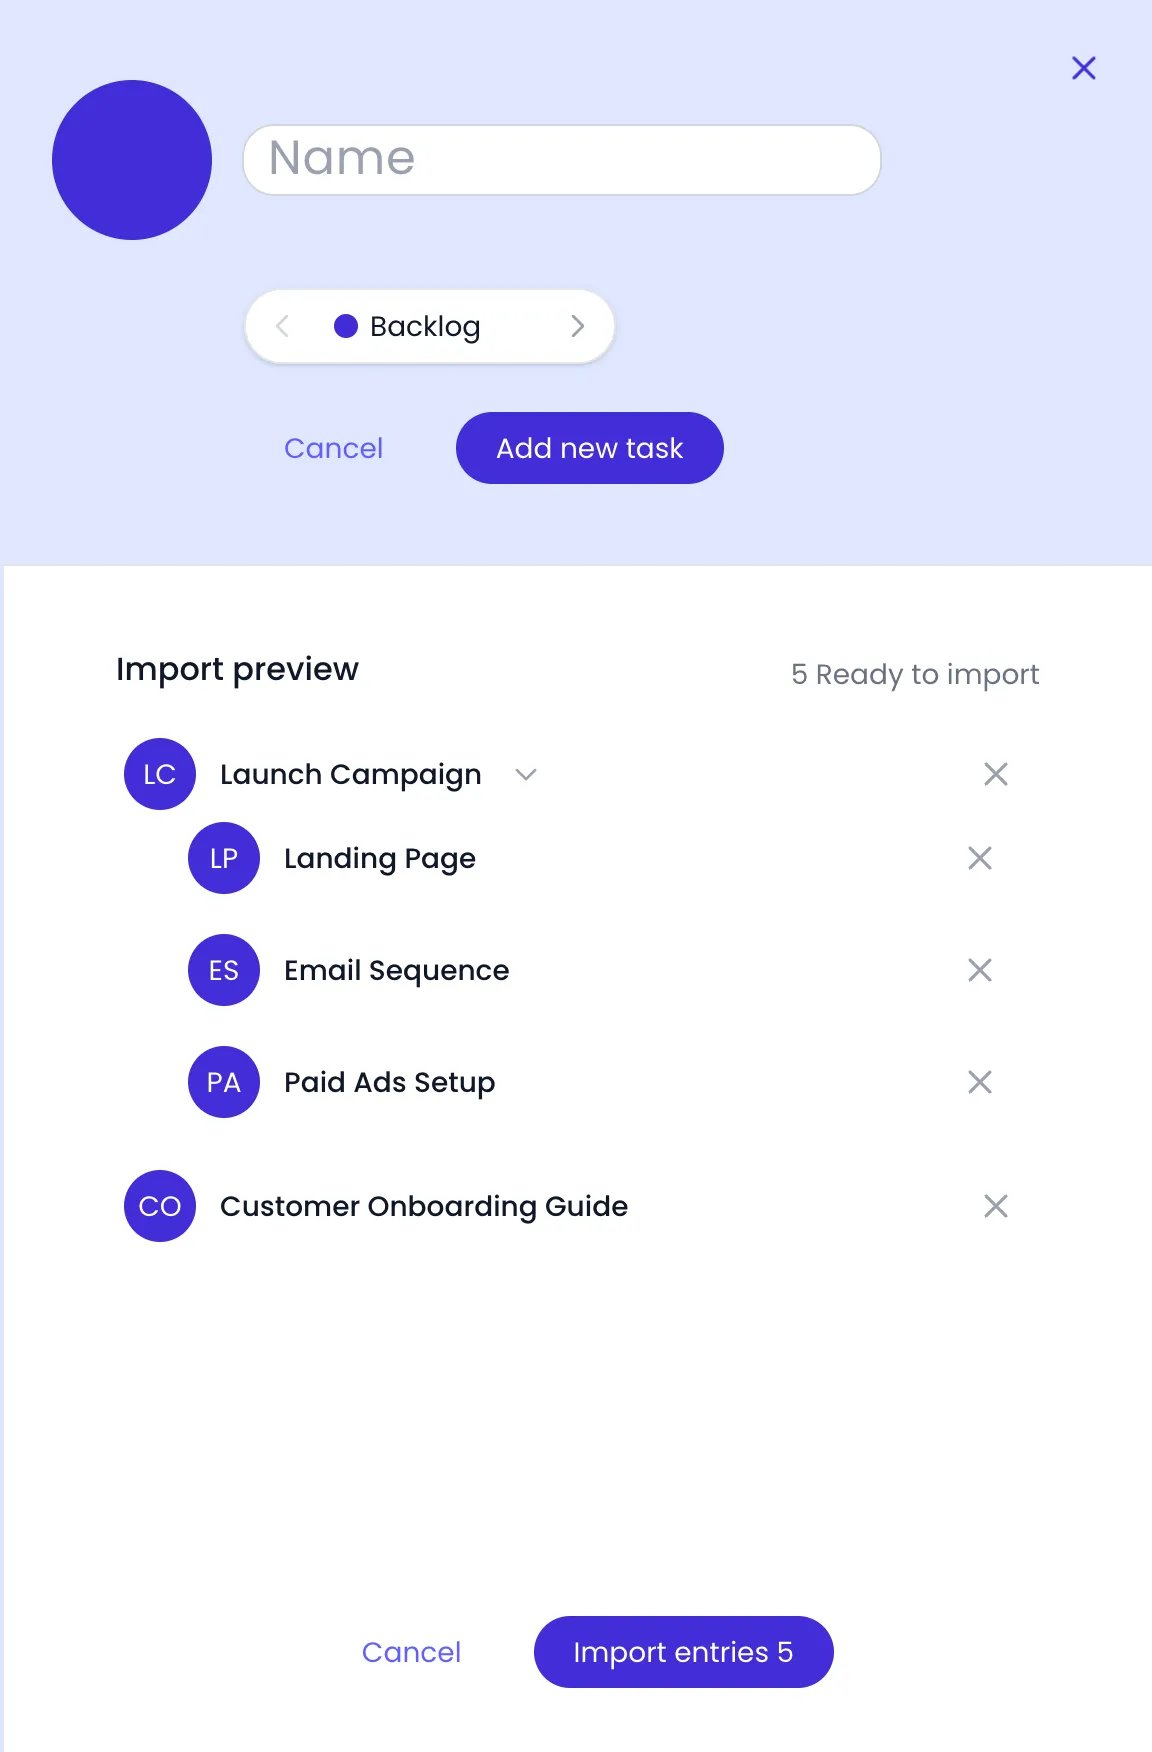
A pasted task list in the Import preview, before Import entries
Task statuses
Statuses are the steps of a planning’s workflow — the same statuses that form the columns of the Kanban board. To edit them, open the planning’s settings dialog, which lists them under Task statuses:- At the top of the Planning page, click the settings button next to the planning name.
- On the Kanban board, click a column’s name.
- Add a status — Type its name in the Add new status field and confirm.
- Rename or recolor a status — Click a status to edit its name or pick a new color.
- Reorder statuses — Drag a status up or down. The order defines the column order on the Kanban board.
- Limit a status — Set Max tasks to cap how many tasks the status can hold. See WIP limits.
- Delete a status — Only possible when the status holds no tasks (including tasks marked done). Every planning must keep at least one status.
Assigning tasks
Beebole distinguishes the person responsible for a task from the people it is available to:- Owner — The single person doing the task. Pick them in the task detail panel (Select the owner); a task can only have one owner. Next to the owner you can set % FTE, the share of their working time dedicated to the task — Beebole uses the owner’s work schedule and this percentage when fitting planned time between the task’s dates. Under the owner, Tentative marks the assignment as not confirmed yet: the task reserves the owner’s capacity but stays out of reports until you switch it off, as for tentative bookings.
- Potential owners — People or tags the task is assigned to. In filters, these appear as Potential owner and Potential owner tag.
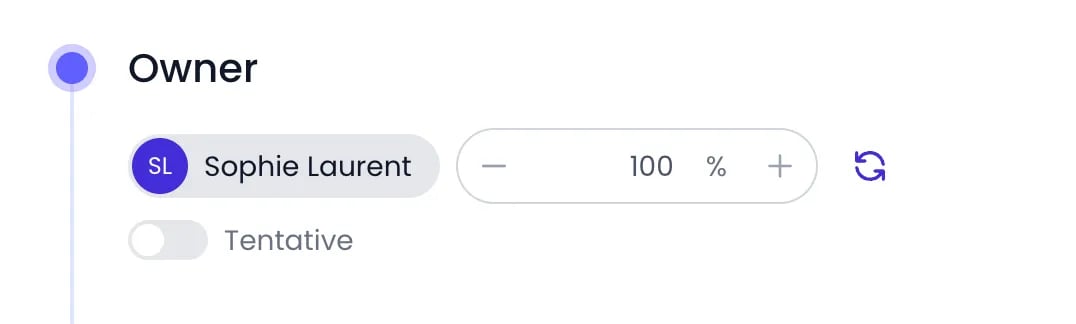
A task's Owner panel: the owner, their share of working time, and Tentative
Subtasks and hierarchy
Tasks nest into subtasks, as deep as your plan requires. The hierarchy is shared by all views.- To create a subtask, hover over the task’s row in the Gantt or List view and click the + button next to its name (see Adding tasks in place), or select the task and press ⌘+A to open the add form for a subtask.
- To indent or outdent with the keyboard, select a task in the Gantt or List view and press Tab to make it a subtask of the task above it, or Shift+Tab to move it up one level.
- To move a task under a different parent, hover over the breadcrumb above the task’s name (in the detail panel or on a Kanban card), click the edit button (Change parent), and pick the new parent with Choose a task. The list only offers tasks from the same planning.
- To expand or collapse a parent task, click the chevron next to it. ⌘+Click the chevron to expand or collapse all.
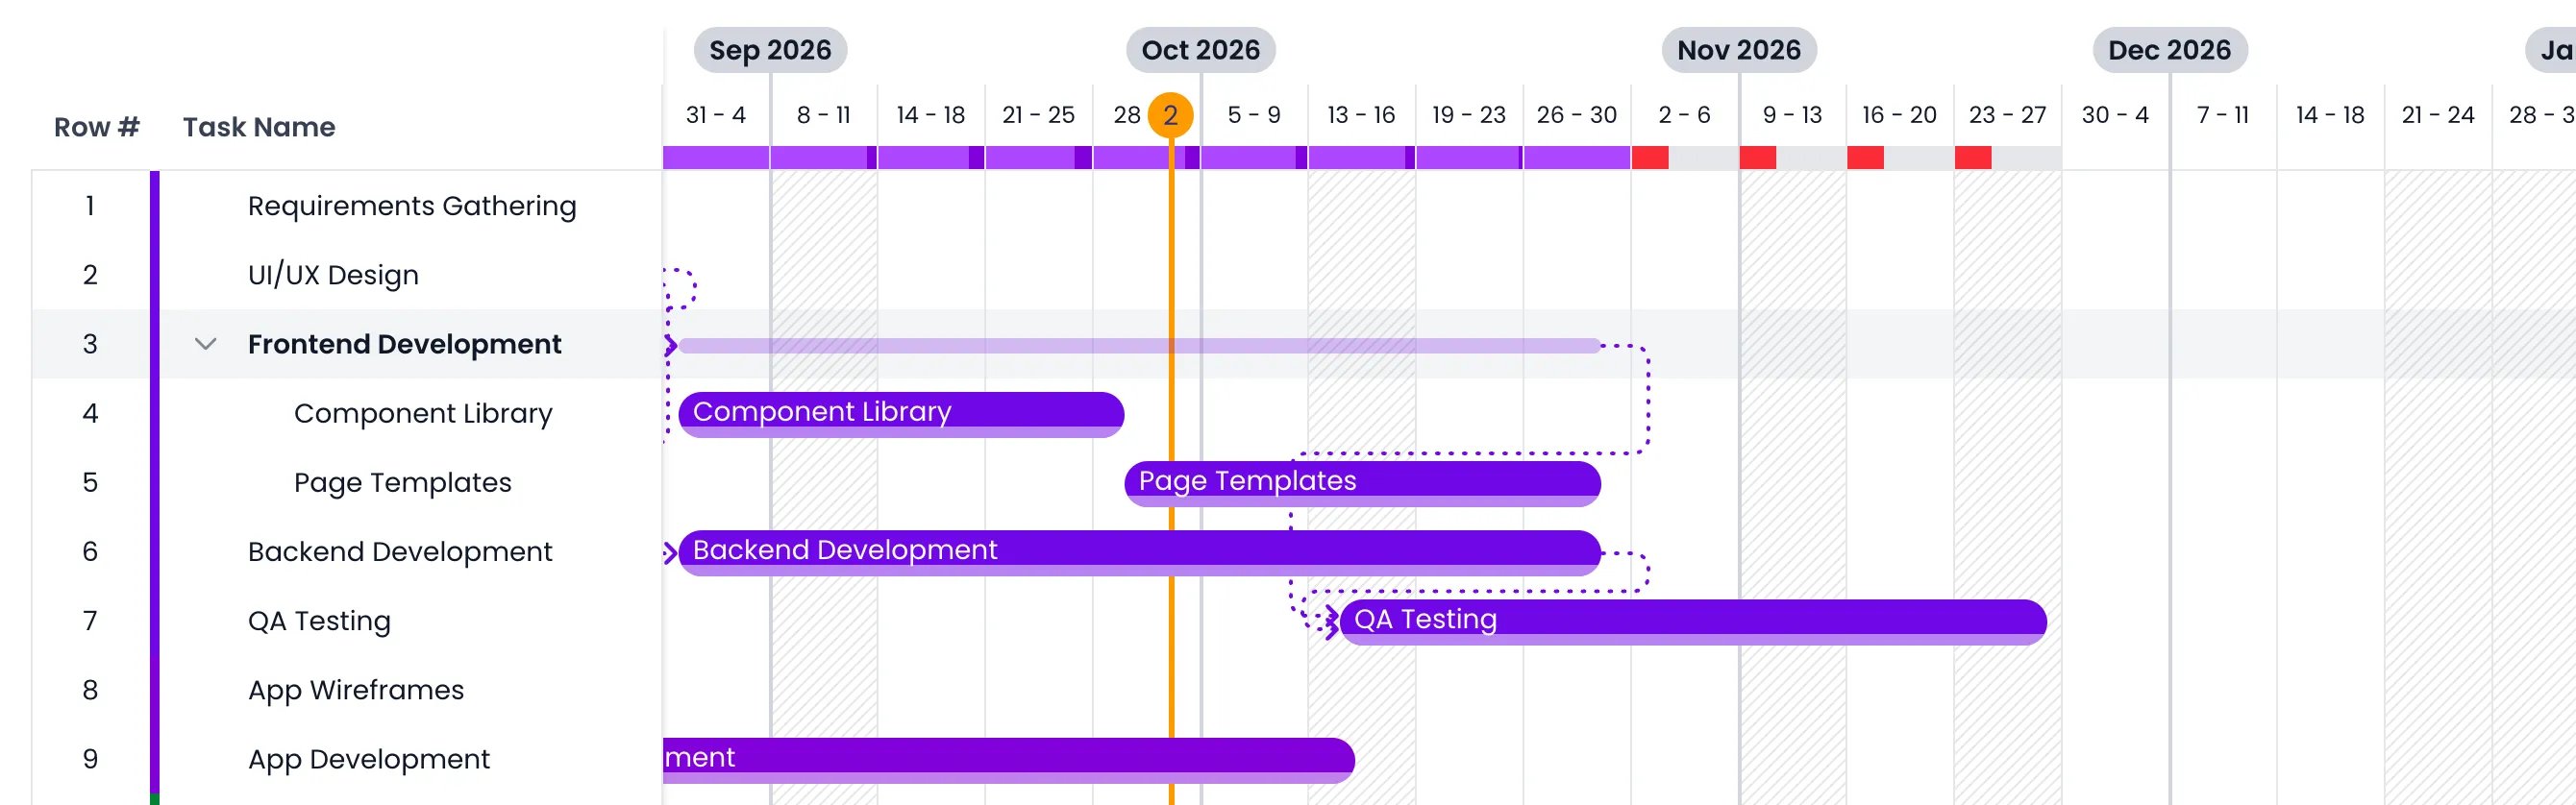
A parent task expanded to its subtasks in the Gantt view
Scheduling dates and planned time
Open a task’s detail panel to set its schedule:- Dates — Pick the start and end dates with the date-range picker. A task runs over whole days by default; uncheck All day to give it exact start and end times instead — see giving a task hours.
- Planned in hours / Planned in days — Enter the planned amount of work. Next to the value, a pill shows the capacity the owner’s schedule leaves between the task’s dates; hover it to read the planned time against that capacity.
- Date locks — Lock buttons flank the date picker (Lock start date and Lock end date). One edge is locked at a time — the start by default. When planned time no longer fits between the dates, Beebole moves the unlocked edge: with the end date locked, the start moves earlier; with the start locked, the end extends. When planned time overflows the period, the pill turns red and grows two arrows: the down arrow cuts the planned time to what the period holds (its tooltip names both figures, as in Reduce 12h to 8h), and the up arrow moves the unlocked edge out to fit the planned time (its tooltip names the new date, as in Change end date to 12 Mar 2026).
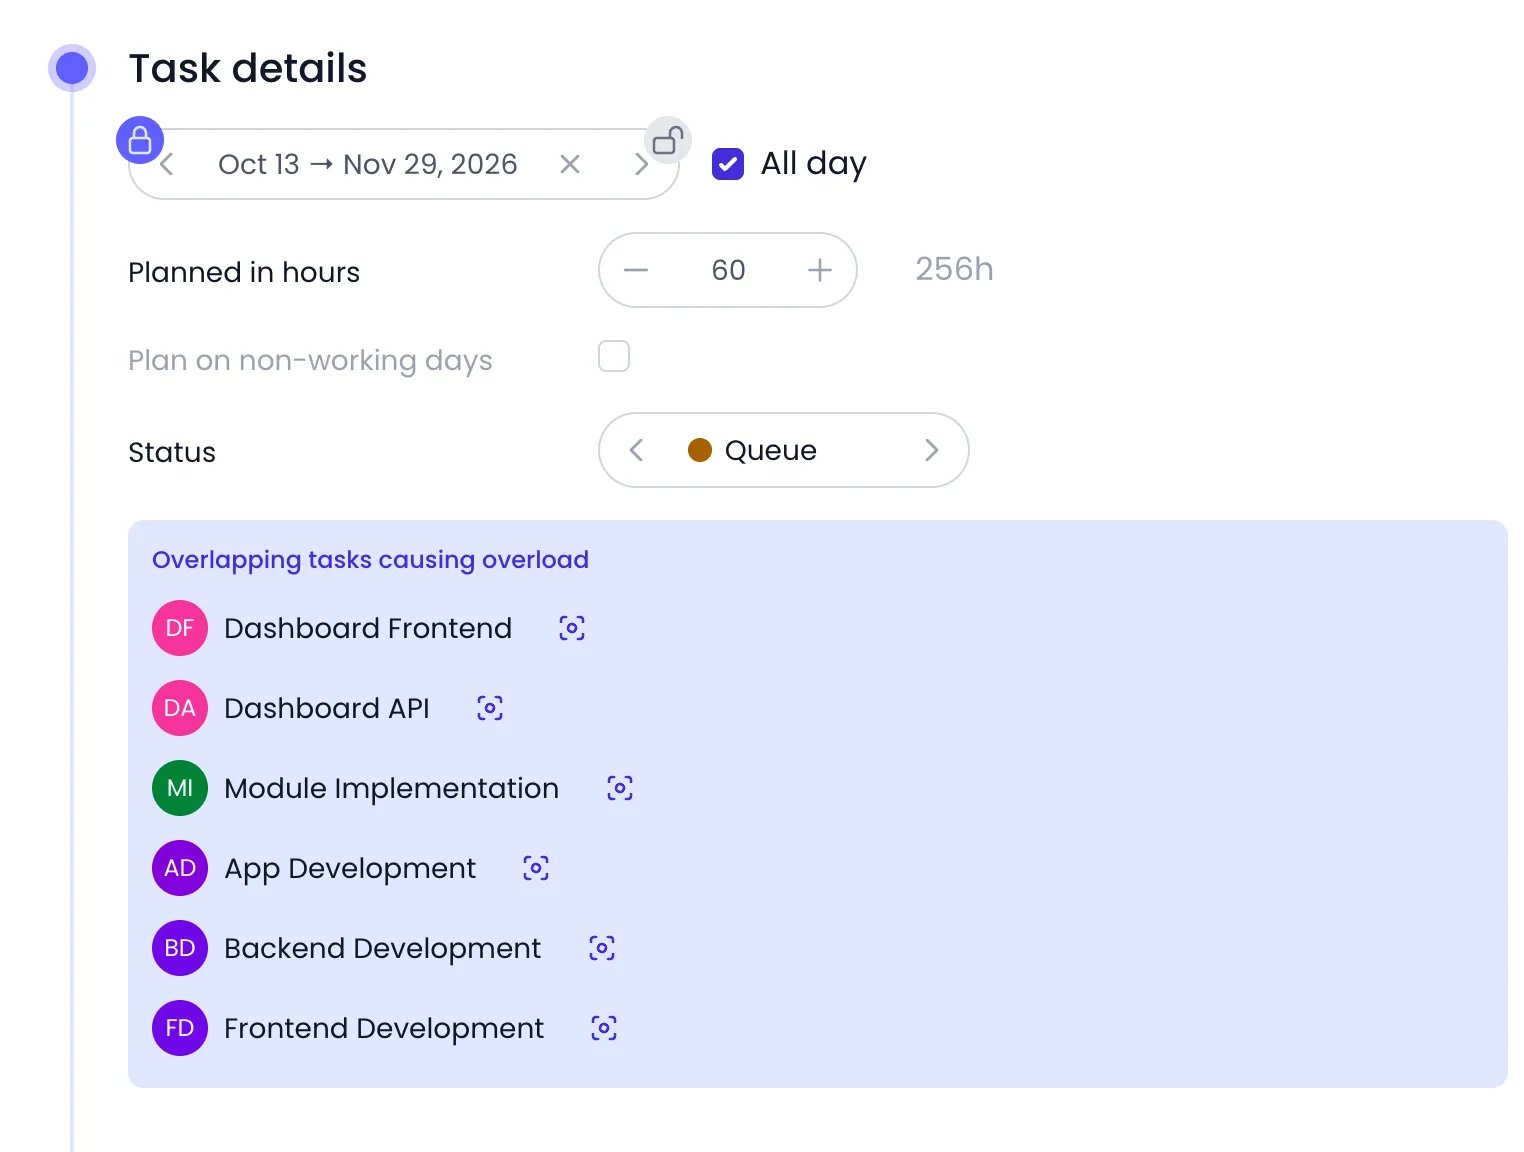
A task's schedule: whole days between the lock buttons, planned time with its capacity pill, and the overload warning
Tracking time on tasks
Time entries can be recorded directly against tasks:- From the timesheet — People add rows in the Tasks section of their timesheet and log hours on a task, just like on a project. Tasks someone owns are listed first in the add-task picker, so their own work is quickest to reach.
- From a suggestion — A dated task assigned to someone reaches them as a suggested entry rather than being added to their timesheet as a row automatically. Accepting the suggestion creates the entry and pins the row. The exception is the Allow only planned tasks in the timesheet restriction: when it is on, the tasks a person owns appear in their timesheet on their own, from every planning, and time can be entered only on those tasks and only within each task’s planned dates.
- From a Kanban card — Hover over a card and click the clock button (Add time) to log time on that task for today. Once time is logged, the card shows a pill with the logged total next to the planned time, in hours (for example
4 / 8). See Kanban board.
Descriptions, custom fields, and tags
Beyond scheduling, each task carries:- Description — A rich-text panel for context, acceptance criteria, links, and file attachments, with @mentions to reference teammates. See task descriptions for the editor’s features.
- Custom fields — Organization-defined fields (text, numbers, dates, URLs, booleans) that appear in the task detail panel. Define them in Settings > Custom Fields and make them visible for tasks — visibility can even be limited to specific plannings. See Custom fields.
- Tags — Label tasks with tags to group and filter them across categories, and to report on them by team, client, or any dimension you define.
Marking tasks done and deleting them
Each task has a ⋯ action menu (hover over its row in the Gantt or List view, or over its Kanban card) with Duplicate, Rename, Done, Reopen, and Delete.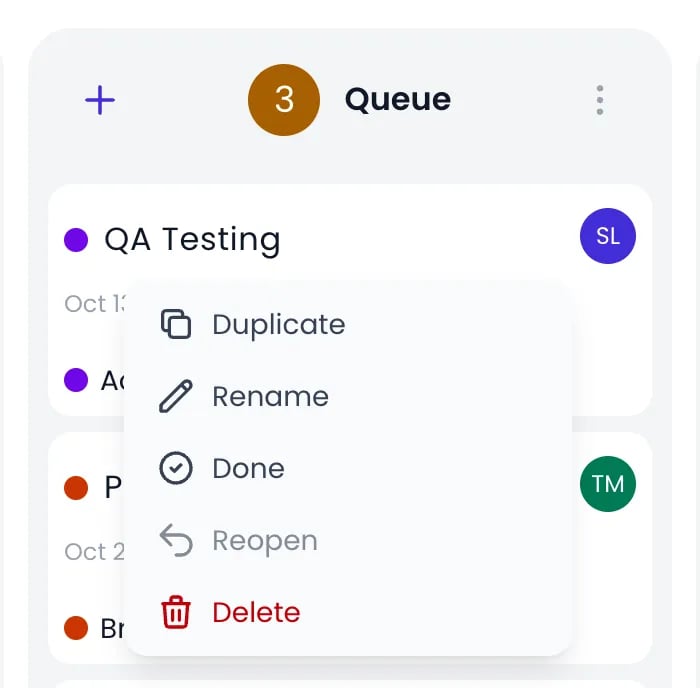
A task's ⋯ menu on its Kanban card
- The button before each task’s name in the List view: Done, or Reopen on a task already done. Only Delete stays at the end of the row.
- A Kanban column’s ⋯ menu, for every task in the column or only the selected cards (see Kanban board).
- Set as done in the menu of a task row in the timesheet, for people allowed to manage tasks.
Viewing tasks your way
The Planning page shows your tasks through saved views — tabs above the task list. Click Add a view and pick Gantt chart, Kanban, Staffing, or List; each view remembers its own settings (columns, grouping, period, sort, or card fields). Drag a tab sideways to put the views in the order you want. When a Gantt or Staffing view is locked to a fixed Period, the period selector sits on the left, before the tabs. Use the Filters button to narrow any view by task, status, owner, potential owner, project, or tags — the button shows the active filter count, and toggling it off keeps the filters for later.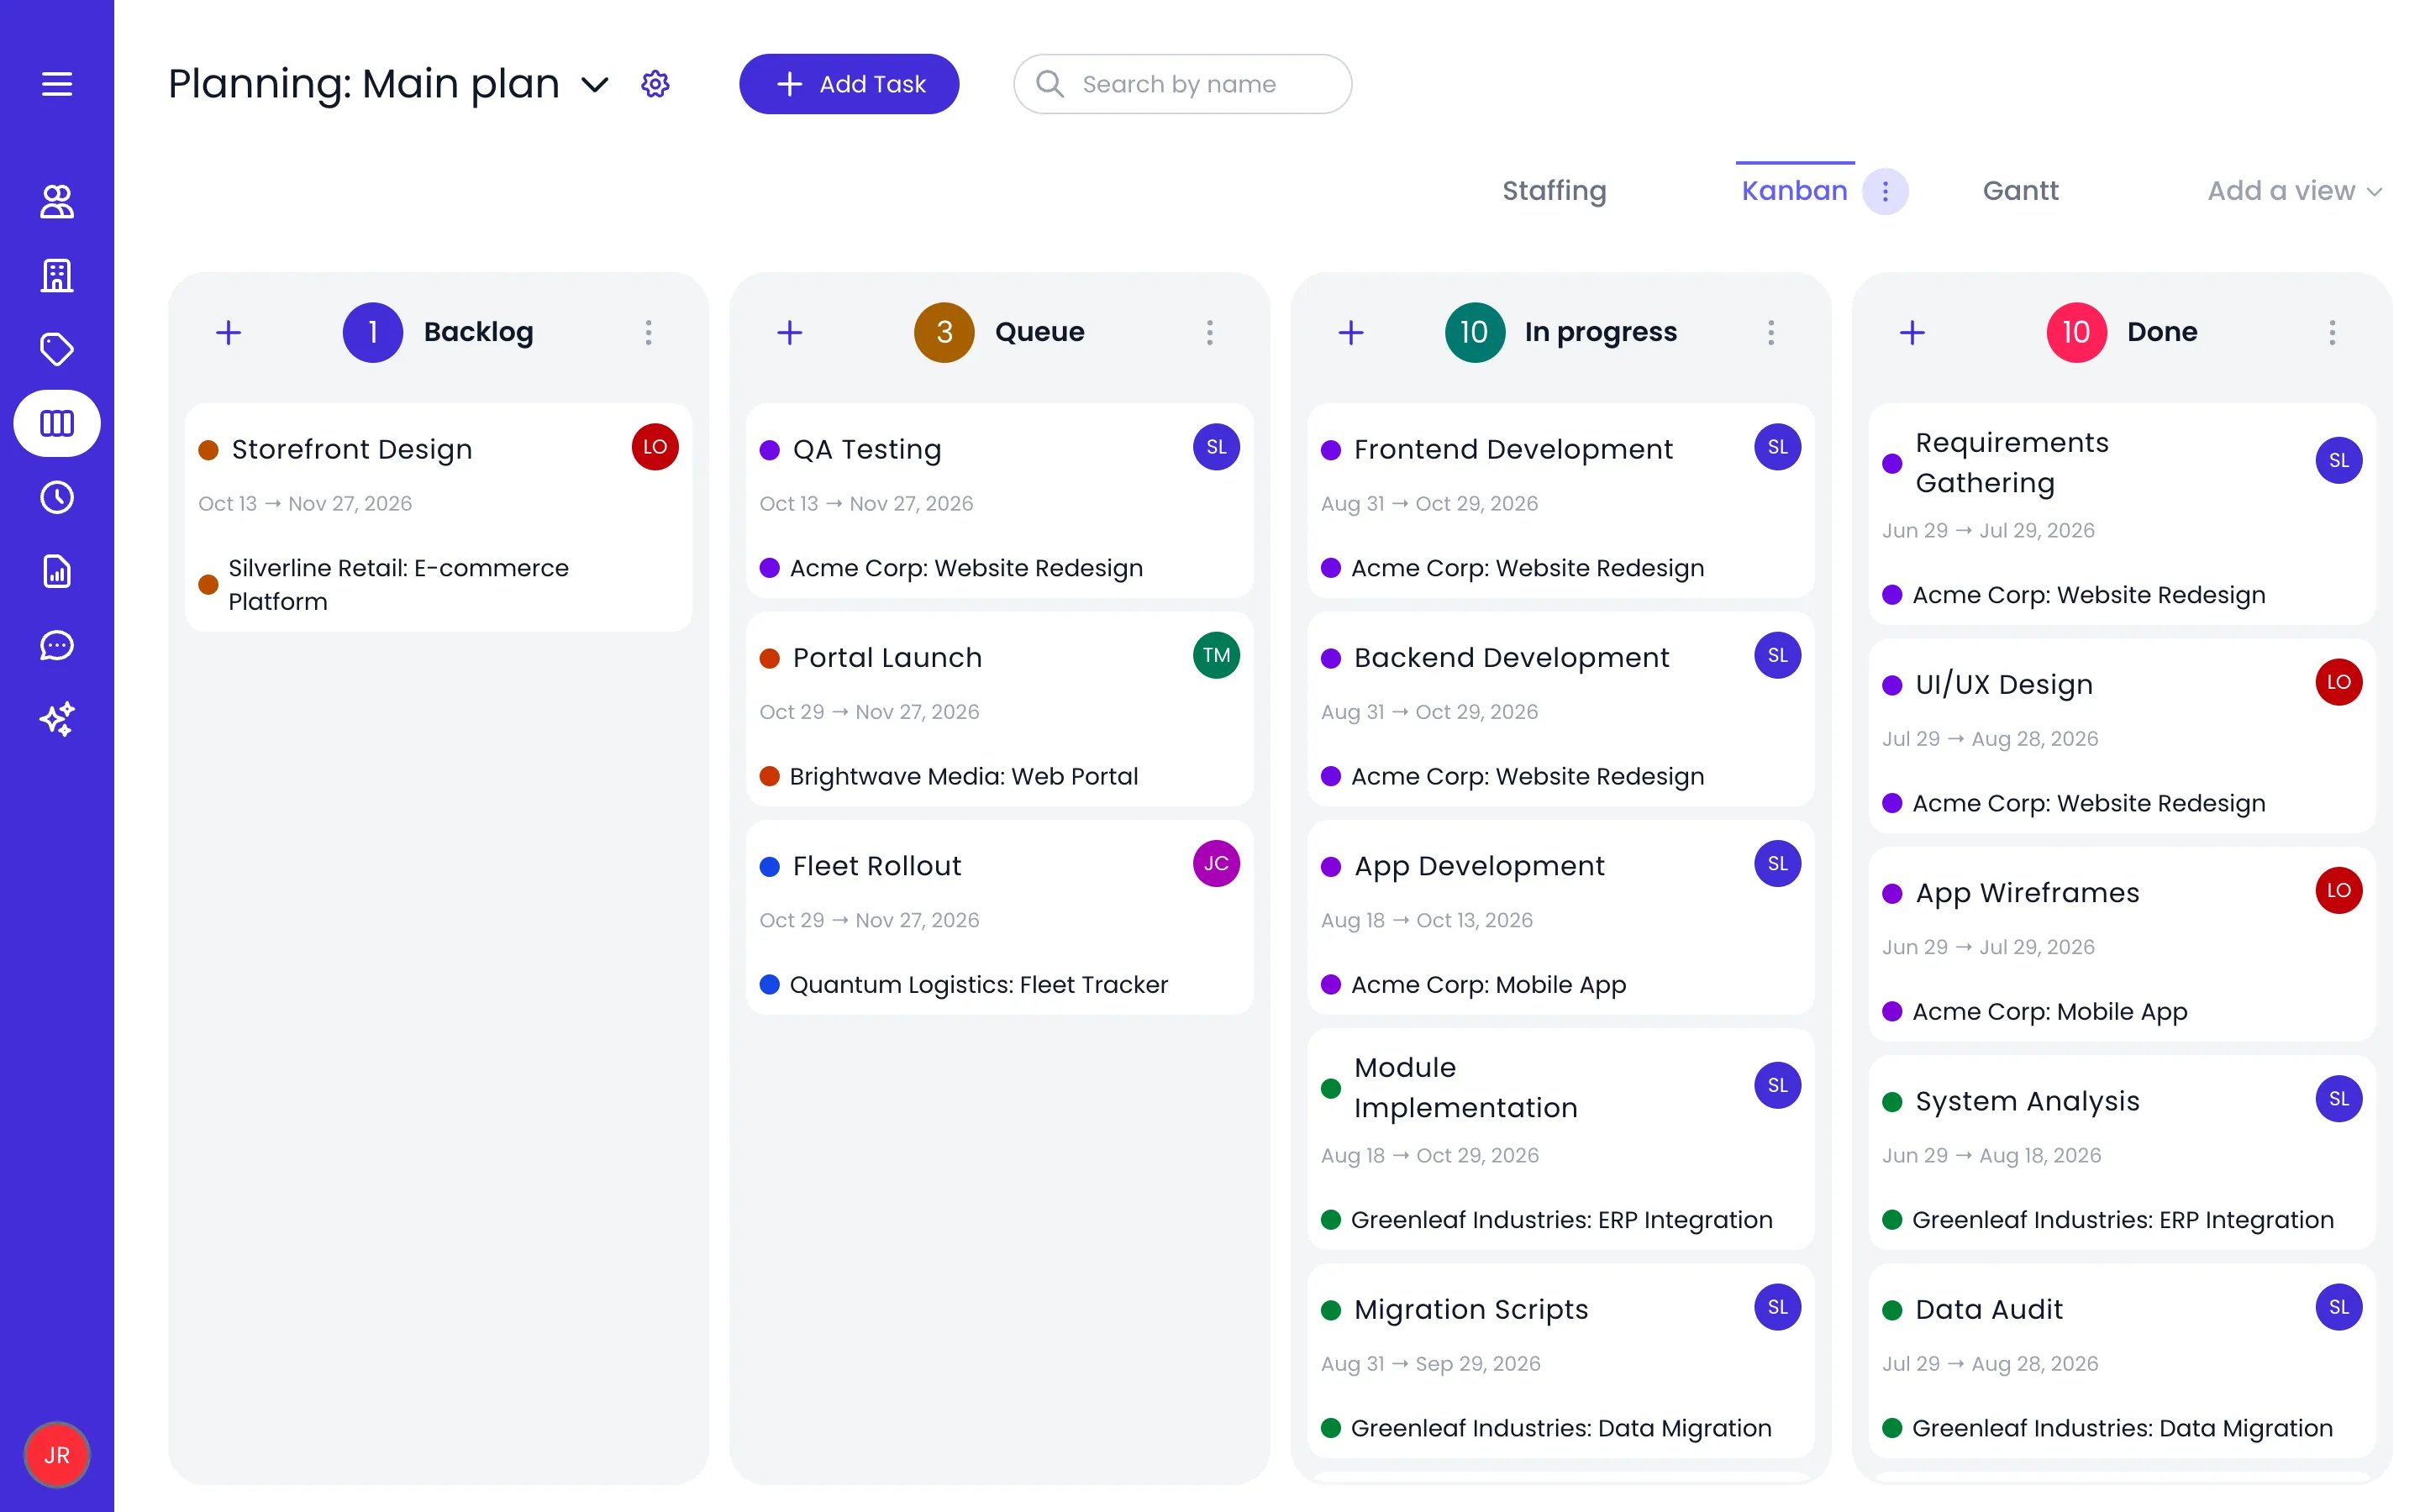
The Main plan planning on its Kanban view, next to the Staffing and Gantt views
Gantt chart
Kanban board
Staffing
List view
Related content
Timesheets
Timesheet and Planning Settings
Custom fields
Projects
Frequently asked questions
Are tasks part of projects in Beebole?
Are tasks part of projects in Beebole?
Can I import or export tasks in Beebole?
Can I import or export tasks in Beebole?
Can people track time on any task?
Can people track time on any task?
What is the difference between a Tasks planning and a Bookings planning?
What is the difference between a Tasks planning and a Bookings planning?
Can I lock planning changes before a certain date?
Can I lock planning changes before a certain date?
What is the difference between the Owner and the Potential owners of a task?
What is the difference between the Owner and the Potential owners of a task?